Step by Step Guide to T-Shirt Manufacturing for Business
INDEX
Step by Step Guide to T-Shirt Manufacturing for Business
- Process flow for T-shirt making
- Steps by step guide for order processing
- T-Shirt stitching process:
- T-Shirt Finishing Process
Are you interested in starting T-shirt business? Whether it is a manufacturing business or planning for starting your own t-shirt brand, you need to learn t-shirt manufacturing process. From design a t-shirt to shipping the t-shirt to retail store.
In this post I will discuss t-shirt manufacturing step by step – from order receiving to manufacturing a t-shirt in mass production.
This post is completed in four parts
#1. Process flow for T-shirt making
#2. Step by step guide to order processing
#3. T-shirt stitching process
#4. T-shirt finishing process
1. Process flow for T-shirt making
The manufacturing process of the t-shirt starts with designing a t-shirt, sourcing fabrics, and ends after selling the t-shirt to retailers. It is considered that the design part is completed as the buyer’s end and as a manufacturer, you get order of a given style. For such orders, order processing involves following process flow.
P.S. You can do garment sampling before starting the bulk production. Read this article to learn the importance of sampling.
PPS: Many buyers provide instruction for stitching in techpack. Follow those instructions for workmanship, printing, washing, packing (if applicable).
2. Steps by step guide for order processing
Here are the steps to be followed for making t-shirts (from order receiving to shipment).
- Once you receive the t-shirt sample with the order, analyze the garment and list down all detailing (construction, workmanship, seam, the fabric used, trims attached, etc). Estimate the consumption of fabric and trims per garment.
- Make a bill of materials (BOM) after receiving the order. Include all items in the BOM.
- Source Fabrics and trims as per requirement.
- After receiving fabrics and trims, check for the quality and quantity of sourced items. Fabric and trims need to be checked as per specification (quality standards). For the confirmation for fabric properties, you might need to send fabric samples to the testing labs. Test fabric shrinkage.
- Develop patterns for the style. Pattern grading to be done for different sizes. Make a sample marker with actual garment patterns and find an average consumption of fabrics.
- Make two/three sample garments and follow all processes to be followed in bulk production (e.g. washing and finishing). Check these samples after finishing. According to the checking, a report of the sample does correction if needed.
- This process will stop you from making mistakes in patterns and shrinkage related issues in fabrics. Just to be safe from losing fabric and also maintaining the quality of the final product.
- Start the bulk process
- Lay fabric on the table as per marker length. Cut multiple layers at a time to save time in cutting. You can even layer multiple colors together. Just keep in mind to check the size ratio.
- Make a marker on the top layer. Cut fabric as per pattern. Cut quantity to be as per size ratio in the in order. You can cut some extra garments for buffer. As if some defective or rejected garment are made in the following processes.
- Check cut panels randomly for fabric defects and cutting is done according to the pattern.
- Make bundles of cutting (if required). Or you can feed complete layers to the sewing operator.
- Set a group of tailors for stitching garments. Define the sequence of the operations to be followed by tailors. Sew garments maintaining stitching quality.
- Check stitching quality during sewing and at the end of sewing. Do correction of a defective garment found in the line. Repair work (alteration and part changing job) can be done separately or by the same tailors.
- Send a stitched garment to the finishing section. Trim uncut threads.
- Remove stains before pressing garments with a steam iron (if stains are found in garments). If needed wash garments for cleaning and removing stains and getting wash effect.
- Press garments.
- Fold garments. Attach hang tags and price tags to garments. Pack garments into poly bags. Pack garments according to customer requirements.
- You can check finished and packed garments randomly for quality assurance.
- Store packed garments for shipping to your buyers.
Note: In case you are making t-shirt for your own brand, you have to design the t-shirt, prepare techpack and you have to set quality standards. In that case order processing would vary.
P.S. Your t-shirt design may have value addition like printing and embroidery design. So printing/embroidery process will be included based on the design at what stage printing to be done. Mostly printing of t-shirt is done on t-shirt panels. I mean after cutting, garment panels are sent to printing house for printing. After printing work cutting panels are sent to stitching floor.
3. T-Shirt stitching process:
If you have not made a t-shirt earlier, you will be in dilemma on how to start making the t-shirt. I know you will be hiring tailors for making t-shirt and your tailors know how to sew the complete t-shirt. However, I want you to learn how to make the t-shirt from fabric panels. I have listed operation sequence to be followed making a t-shirt. I have also mentioned machine types to be selected for each operation.
Buy one t-shirt as sample or pick one t-shirt from your clothes before you read following processes. Having one sample in hand you will understand quickly what I am saying here. A round neck t-shirt has 5 components
- Front panel
- Back panel
- 2 Sleeves
- Neck rib
List of operations involved in making t-shirt
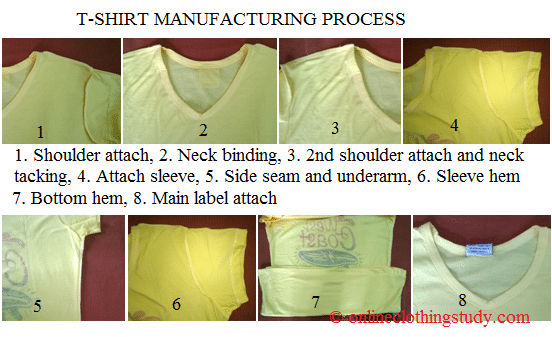
In this section I have explained how t-shirt components are assembled step by step.
#1. Shoulder Join: Join the both shoulders using an overlock machine.
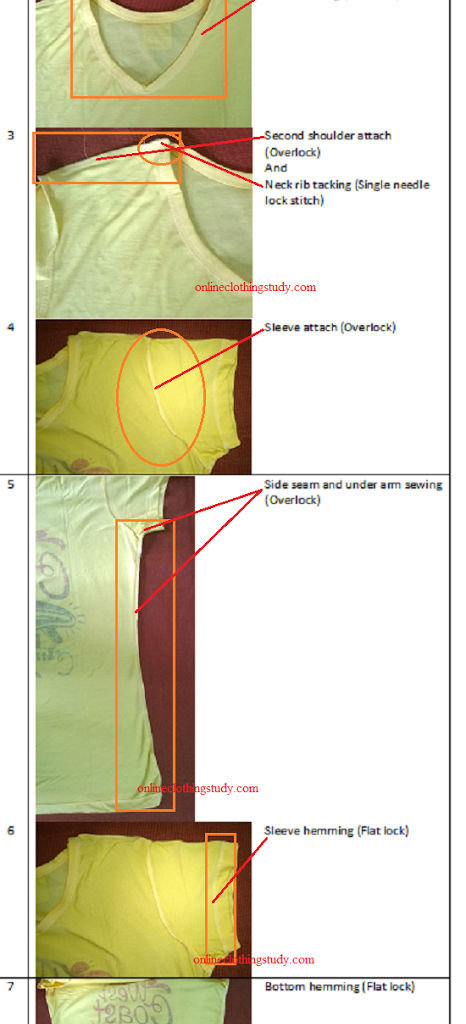
#2. Neck rib tuck: Join ends of the rib using a lock stitch machine. Neck rib length should be cut a per neck circumference. (A different method can be used for neck rib. In the following figure, neck piping is done first. After attaching one shoulder, neck is closed. )
#3.Neck rib join to neck: Fold the neck rib and attach to the neck. While attaching neck rib stretch both neck and rib. Attach neck rib using overlock machine and top stitch using lock stitch or chain stitch machine. Which machine to choose depends on the t-shirt design. (In case of neck piping, it is done using Flat lock machine).
#4. Label make: This process is optional. In case you have source main label/care label in the roll form, cut it and keep ready for the following process. Sometimes you may need to join more than one label together and later you will attach to the label to the t-shirt. A single needle lock stitch machine is used for this operation.
#5. Back Neck Binding/Neck tape: This operation is also an optional process. In quality t-shirt, you may show inside back neck overlock seam is hide by binding. For binding you need a binder (one kind of folder). A flat lock machine is used for binding.
Instead of binding with self fabric, you can hide the back seam margin using a twill tape. Use a single needle lock stitch machine to attach the tape a back neck.
#6. Front neck T/S: Top stitch the front neck using 2 needle flat lock machine
#7. Back Neck T/S: Finish neck binding using a single needle lock stitch machine. While finishing the back neck tape/binding, attach the size label. Follow the instruction provided in the techpack for position of the attaching size label.
#8. Sleeve Hem: Hem sleeve opening in the flat lock machine. (Alternatively you sleeve hemming is after underarm overlock).
#9. Sleeve attach: Attach both sleeves at the armhole. An overlock machine is used to attach the sleeve.
#10. Side seam with care label: Join side seams and under arm using an ovelock machine. If you want to attach the wash care label, attach it left side of the garment, above 10 cm from bottom hem.
#11. Sleeve Tacking: Tack sleeve at the overlock stitch to secure the stitch. Use single needle machine for this job.
#12. Bottom Hem: At last hem the t-shirt bottom using a 2 needle flat lock machine.
Sewing machine used in T-shirt making
Most common sewing machines used for making t-shirts are these.
- Single needle lock stitch machine
- Overlock machine
- Flat lock sewing machine (Cylinder bed and flat bed flat lock)
Step by step stitching operations (assembling the t-shirt) is shown in the following chart. Stitching operations that are shown in the following infographic are based on a particular t-shirt sample (it may differ from the above steps).
4. T-Shirt Finishing Process
After stitching the T-shirt you have to finish it and pack (if apply) it prior to sending the t-shirts to retails store. Quality of packing and presentation is as important as the product quality. Following are process you need to do in finishing process.
- Thread trimming: Trim all thread tails and remove loose threads.
- Quality checking: Check stitching quality. Follow the quality document for checking quality. In the finished garment fabric defects and stitching, defects should not be allowed.
- Pressing / Ironing: Press all garments using a steam press. By pressing creases on the t-shirt is removed.
- Folding: Fold the t-shirt according to the folding dimension.
- Tagging: Attach hang tags, price tags using tag-gun.
- Packing: Pack individual t-shirts into poly bags. Or follow packing instruction from your buyer. See the following image for a packed t-shirt.